Saturday 7 November 2015

Before & After

I don't think I have ever shown this before, but I thought it would be interesting to show a recent project, first on the mannequin head before being cut and styled, and then after it has been attached on an actual scalp.

The photos are un-retouched, and no-one was harmed during the installation of this hairpiece! :P

This is a mix of 'Brazilian' remy hair (custom coloured) and high heat synthetic for the grey.  It is knotted using only single strands and single knots on Hugo Royer 2905 lace.  The knots have been lightly bleached to help them disappear against the scalp.  It was attached in the last two photos using Walker 3-mil lace front tape.


Saturday 24 October 2015

Dark, re-fronted commercial wig

When I first started learning about ventilation, I bought a few inexpensive (and a couple of not-so-inexpensive) 'lace front' wigs, to see how they were made.

In hindsight, the commercial wigs really weren't much help – the knotting was not great for the most part, and all but one of them were knotted on stiff, scratchy monofilament mesh, not lace at all.

As a result I have a small collection of mediocre commercial wigs that are just sitting on a shelf in my office.  I decided, rather than let them go to waste, that I would re-front them using decent lace and finer knotting.

I just finished the first one.  The main body of the wig is good, and even the knotting wasn't terrible, it's just that the scratchy monofilament (aka 'German' lace) was very uncomfortable.  Also the shape of the hairline was very round and unnatural.

I have redone the entire lace section using only single (2-way) knotting, and I think the final result is much more natural.  This is high temperature synthetic hair, so it probably wouldn't work as a hair-replacement wig, but I think it would make an excellent theatre or opera wig or even a fun fashion wig.


As a side note, I have the wig on a cheap plastic mannequin head that I bought to help when I'm working on hairlines.  I find the eyes really disturbing, which is why I have it wearing sunglasses... :P

Friday 2 October 2015

Thor No More

At long last I plucked up the courage to start the final cut-in on the blonde synthetic wig that I had made previously (see: Making Waves).  Its long, Thor-like locks have given way to a much more respectable pompadour style.

I worked on it most of the afternoon, and it's getting close to where I want it to be, although it still needs some finessing.  I have realized that I really need to take a barbering course.  My cutting skills are not good enough for this kind of work!

The synthetic hair also made my job a LOT more difficult!  The synthetic is great for longer styles, but requires a lot of work with the curling iron to make it look natural after it has been cut.

Anyway, here are a couple of photos of the cut-in so far:


Thursday 24 September 2015

Cross-knotting (aka 2-way knotting) explained

A few people have asked me to explain the idea of cross-knotting (cross-ventilation / 2-way knotting).   The most common knot used in traditional wig-making (except in the Chinese factories) is the single, or flat, knot.   When used properly, the single knot gives the most natural appearance, especially if the hairs are knotted one-at-a-time.

However, single knots can tend to lie quite flat, without much volume.  To combat this, the wig factories use split knots.  These add a LOT of volume to the hair, but in my opinion they look horrible!  Also, I believe that split knots shed much more easily than single knots, which is why factories often resort to using double split knots everywhere except the hairline.  This just makes for an ugly end result, as far as I'm concerned, and the reason why a lot of the factory wigs still look 'wiggy' and fake.

Cross-knotting allows the use of single knots, but adds volume to the hair.  It also adds a more freestyle direction to the knotting so that it's not set so much in a single direction.

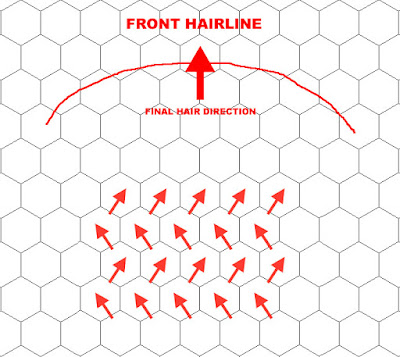
The idea is that every second row of hair is knotted in an alternating direction.  The best way to get the idea is to see it illustrated, so here's a diagram showing the very basic concept:

Cross-knotting / 2-way knotting

In this example, we want the general direction of the hair coming forward from the crown, towards the hairline.  So each row is knotted at slight, alternating angles to the final direction of the hair.

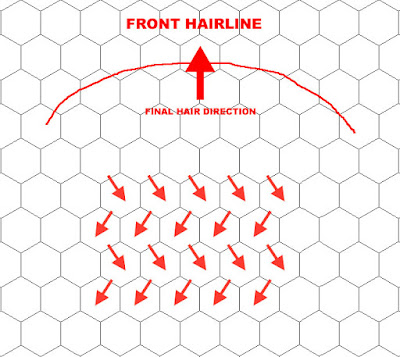
To add even more volume and lift to the hair, a technique called REVERSE cross knotting is used, in which the hair direction is knotted in the exact opposite direction from the final direction you require.  Using the same example, again with the final hair direction being forward from the crown towards the hairline, it is actually knotted backwards at alternating angles.

Reverse cross-knotting

When the hair is finally brushed into its final direction, it retains much more lift at the root, giving a very natural volume to the hair.

Wednesday 23 September 2015

Vintage roller set

I have been trying for ages to find time to learn how to set and style the wigs I make.  I have several sitting on a shelf that are finished as far as the knotting goes, but I haven't known how to style them.

I finally watched a few YouTube videos on roller setting hair, and I tried it for the first time today on the light blonde Marilyn wig that I made ages ago.

The results are far from perfect, but not too bad for my first attempt...


Small front partial piece

I haven't had time to do much ventilation lately, but I just completed knotting this small front partial piece.  It is fully single strand/single knotted, and is cross-ventilated to add some lift.  I used #16 Brazilian hair from YYhair.

The density is higher than I would normally like, but this piece was made to replace the hairline on an existing topper which is quite dense, so I tied the hair using one knot per hole, with slight graduation at the hairline.

The hair will finally be dyed to match and attached to the existing piece.


Sunday 10 May 2015

New Hipster Hair

I finally finished knotting the topper that I have been working on, and I thought I would post a few pics.  I'm very happy with this one!

This is a high definition piece — all single strand/single knot.  Also, the entire piece is cross-knotted, which I think gives an amazingly natural, realistic look.

It is all synthetic except for the front inch or so, where I used Brazilian hair so that the knots could be bleached.  I need to touch up the colour of the real hair so that it blends better into the darker, more ashy synthetic.

I have done a preliminary cut-in at this point, but the cut still needs some finessing.  Overall, though, I think this one is a winner!


Sunday 5 April 2015

King of crowns

I just finished the crown on the cross-ventilated (2-way) piece I'm working on.  I'm really happy with the knotting on this one.  The hair lies and moves very naturally, and has a nice, natural volume to it.


Tuesday 17 March 2015

Video: reverse, 2-way ventilation


Below is a quick video to show the in-progress results of the reverse, 2-way knotting I am using to add lift to the hair.  I plan to use 2-way knotting for the entire piece, as it creates a 'freestyle' appearance, meaning that the hair can be parted anywhere and will look natural.

The entire piece will also be single strand/single knotted for a very natural scalp appearance.

Click below to view the video:


Thursday 5 March 2015

Adding lift

I have been quite happy with the results of knotting the crown area in some of my wigs.  However I had noticed that the hair at the back tended to lie quite flat against the scalp as it radiated out from the centre of the crown.

I asked Sam Cox, a wigmaker in the UK, if he knew how to solve this problem, and he suggested trying 'reverse two-way' knotting the crown to add some lift to the hair.

Essentially, this involves knotting the hair in the opposite direction of how you ultimately want it to lie.  In addition to this, though, the hair is knotted in two slightly opposing directions, so that none of it falls flat against the scalp when brushed into its final 'resting' direction.

As you can see in this photo, this technique gives the hair a beautiful, natural appearance.  I will definitely be using this method from now in any any area that requires some extra lift!

Reverse, two-way knotted crown.

Sunday 22 February 2015

Narcissistic blond gentleman, prefers himself.

I had pinned the mustache on the blonde refronted wig I made a while back, and I liked the look.  :P


Saturday 3 January 2015

Making waves

I have actually been doing a fair bit of ventilation recently, but not on the most recent re-front of the reddish-blonde wig.  That has been put on hold while I've been working on a commission for someone in the UK who wanted a version of the previous blonde wig I made (the one I'm wearing in the photo with the sunglasses.)

Since this new one will be almost identical to the previous one, I won't bother posting photos.

However, you may remember that my ultimate goal is to cut the original blonde wig down to a short men's style.  I still haven't plucked up the courage to do that, but I have been messing about with the style a bit in the meantime.

Since the receded hairline of the wig is very obviously masculine rather than feminine, I thought I would add some nice manly waves.  In my mind was the image of a mediaeval knight or a Norse god, muscles rippling and long, golden tresses blowing in the wind.

Well... my original effort was a bit more Sex and the City than Game of Thrones, but after a bit of fiddling I think I got it more-or-less to where I wanted it.

Here are a few photos that show the finished wig, at first unstyled, then at the various stages it went through.  I have added a shot at the end to show the hairline, which I think turned out quite well.

If I feel brave enough this weekend, I might try an intermediate haircut, just to shorten the hair to a medium length before progressing to the final cut.  Next stop, Kurt Cobain...